posted December 2, 2019
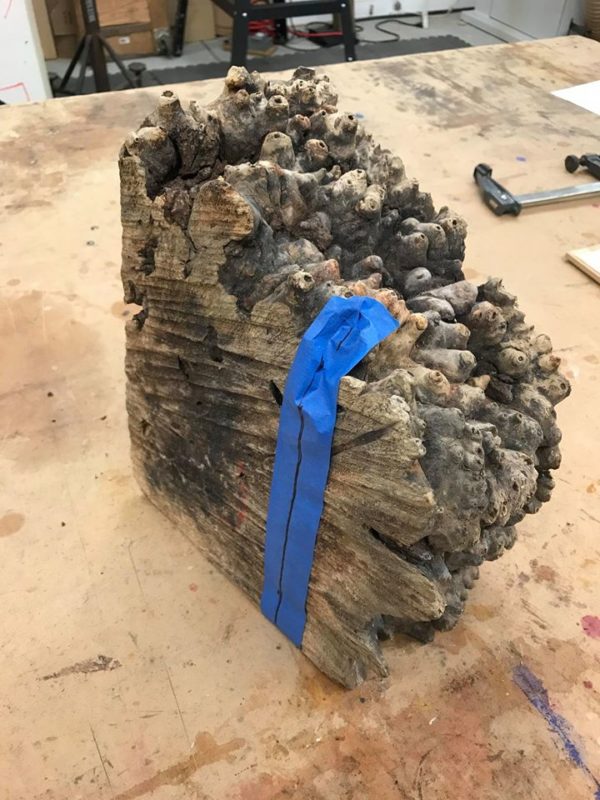
My 68th birthday was October 25th and I decided to give myself a gift. The gift was to give myself the time I needed to create a vessel from this gnarly piece of Buckeye Burl that I had purchased well over a decade and a half ago but I hadn’t had the time to create anything from it.
The Artistry in Wood Show which is held every year at the Sonoma County Museum in Santa Rosa, announced November 14th as their deadline for entries. This show which I have entered almost every year since it began, gave me a focal point to see if I could pull off another vessel in time for it.
As I began working, I reflected on my entire career as a woodworker and realized the greatest gift I had ever given myself in life was the “Permission” to follow my passion at the early age of 21 to become a full time woodworker. Think about that for a moment. Why would I need to give myself permission to become a full time woodworker? Well there is always pressure from parents and Society to become a “success” in life and here in America, becoming successful is synonymous with “money”. Being a woodworker is also synonymous with not making much money.
Fortunately for me I forged ahead and life worked out, but now that I am 2 years south of 70, I wonder what would have happened if I shrank myself into the confines of what I thought Society wanted me to become? I don’t know what the answer is but I believe that if we deny our selves that which we are passionate about that we just might shrivel up and slowly die on the inside. It’s also important to be aware of reality and we need to work at jobs we sometimes don’t like in order to pay the bills.
Well it’s good to be old and wise and to have paid the necessary dues to be in a position to be able to give oneself the gift of time to pursue what you are deeply passionate about.
This gnarly piece of Buckeye Burl has inspired me with many ideas and the design I landed on is somewhat of a classical form. I like to choose forms that I have seen in ancient cultures because they have been proven over time to be of value. Most of the ancient vessels were made from clay (ceramics) and I enjoy reinterpreting them in wood.
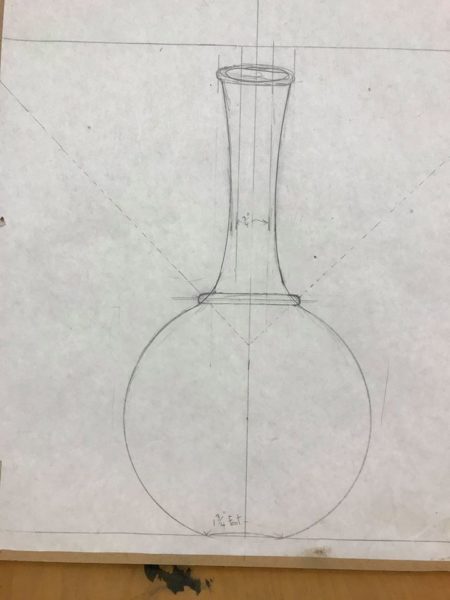
My personal creative process always begins with a drawing and the drawing always depends upon the limitations of the perimeters of a particular piece of wood so the wood and the drawing are interconnected from the start.
As I work I modify the drawing to match the wood and I also modify the wood to match the drawing. Empirical woodworking is what I call it, figuring things out as you go.
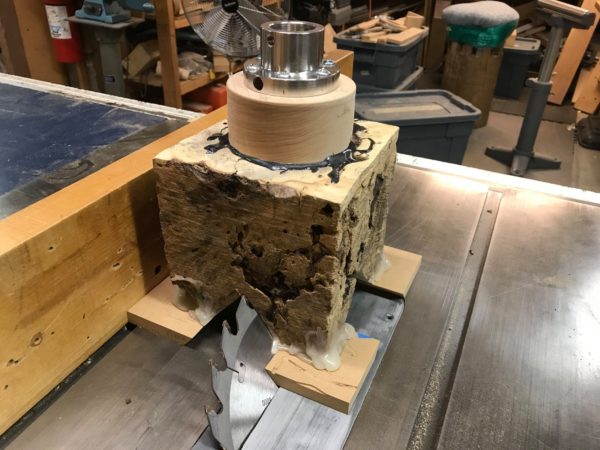
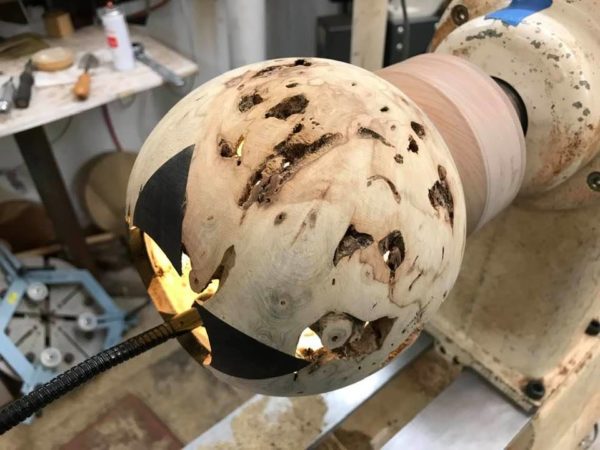
One of the first things that cried out to me was the fact that I had chosen an old decrepit, worm eaten, spalted, rotten piece of burl which needed a reinforced foundation if it were to survive the vessel turning and hollowing process.
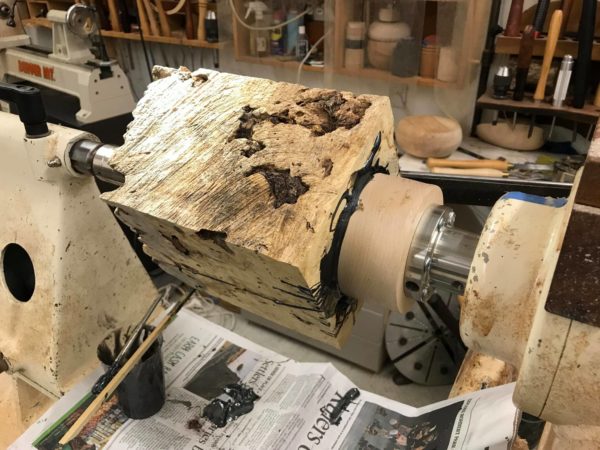
I decided to use a faceplate and a block of hard maple as my foundation of support. As you can see, I turned a tenon on the buckeye burl and epoxied it into the cup shape I turned in the hard maple which I had previously screwed to a faceplate.
I knew from experience that I would have to make this vessel in at least 2 sections, possibly 3 to pull it all together. In order to hollow a sphere, the boring bar needs to be able to turn on a very tight corner. Having a long neck prevents access to the shoulders of the sphere so I decided to cut a section off of the top and save it for the neck.
As I was working on my drawing I decided to sketch a V using a 45 degree square to help me to decide how to locate a segmented ring that I could use to connect the neck to the spherical base. The form is extremely important to me and I wanted to make sure that there was a sense of the curves continuing from the sphere up into the curves of the neck.
Suddenly it hit me! I didn’t draw that V by accident, there is a part of me that really likes the intersection that occurs in geometry when you introduce angles to curves. I remember when Sam Maloof used to come to San Francisco and give lectures and slide shows to the Bay Area Woodworkers Association back in the 80’s and one of the things he said that left a lasting impression on me was that one of the most powerful elements of his chair designs was the intersection of a hard line to a soft curve. Sam’s chairs are sculptural works of art and I have studied them for inspiration. This would be more of a “visual” intersection of a hard line to a soft curve but it still works as a powerful design element so I decided to go with it. This new design upgrade called for cutting V grooves in to the burl and gluing African Blackwood into the grooves.
In my woodturning classes, I ask the students to do an exercise in design. I tell them if you can draw it, then I can show you how to make it,and make it safely without hurting yourself.
I once had a young lady from Germany who apprenticed with me back in the 90’s. Her name was Ulrike and she was an extremely talented woodturner. Ulrike told me that she studied with a German Master and that he told her “the problem with woodturning isn’t how to “cut” the wood with a gouge, it’s how to “hold” the wood in the position you want on the lathe while you turn it”. These words of wisdom have been rolling around in my head ever since. Once you hold a question, somehow the Universe will send you an answer. Well the Universe sent me an answer and it was hot melt glue!
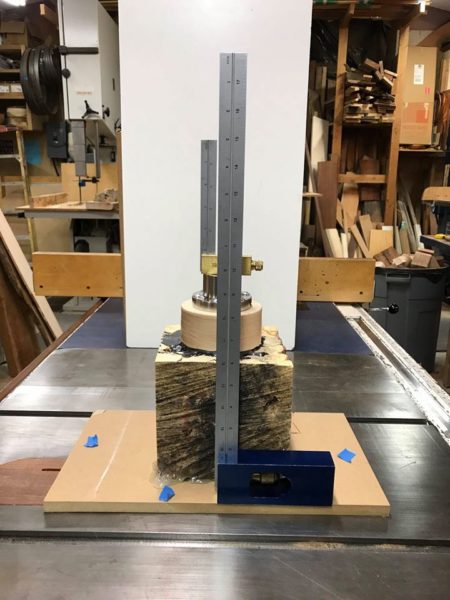
I’ll cut to the chase scene, ….. keeping in mind I need to keep everything on Axis, I kept the faceplate attached while I hot melt glued the block of buckeye burl to a piece of MDF (no I don’t own stock in MDF, I just use it all the time). I took great care to make certain that the faceplate was level and plumb.
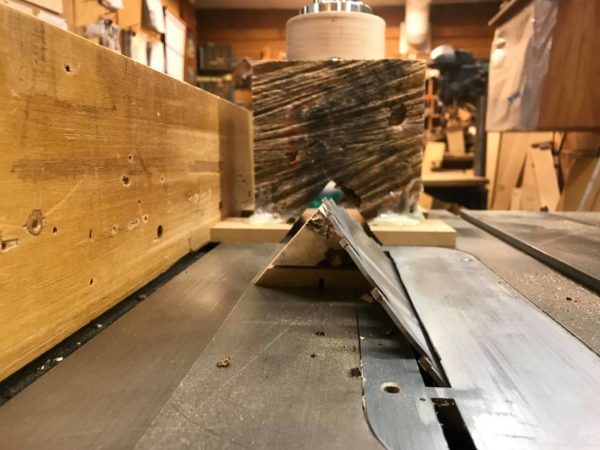
 Next I took the assembly to my tablesaw and used a square toothed ripping blade set at a 40 degree angle and cut away four V grooves.
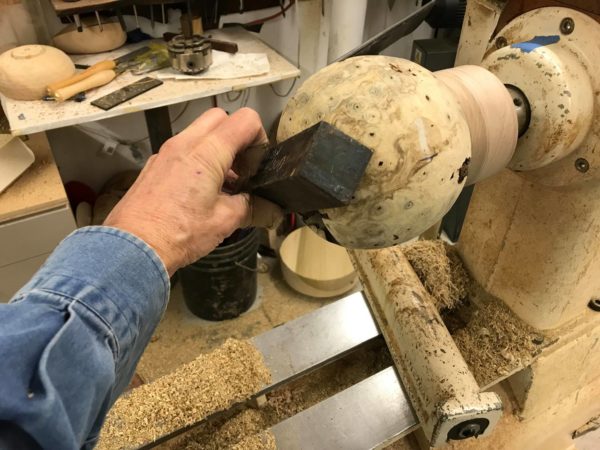
A good way to check and see if a turning is round is to make a template. I used one of those “Beware of Dogs” plastic signs that they sell at hardware stores. Since we don’t own a dog, (we have cats), I thought this would be a good use for this sign. I have some African Blackwood that I wanted to inlay into the V grooves that I cut on the tablesaw but I didn’t want to waste a lot of it so I roughed turned most of the corners away to minimize the amount of waste. I used a bowl gouge with a 40/40 grind as well as a bowl gouge with a traditional grind which is not swept back and has a 50 degree bevel.
As you can see from the progress shots, I turned, then stopped and checked the high spots with my template, then turned some more, stopped and checked etc. After awhile I had removed enough wood that I was ready to glue in the African Blackwood. Since my V was cut on a 40 degree angle, I used my disc sander to bevel the blackwood until it fit tight.
After the glue dried, I used my 20 inch bandsaw to remove the excess. Never, I mean never try to bandsaw a slice off of wood that is round without using a V block to stabilize the round blank.
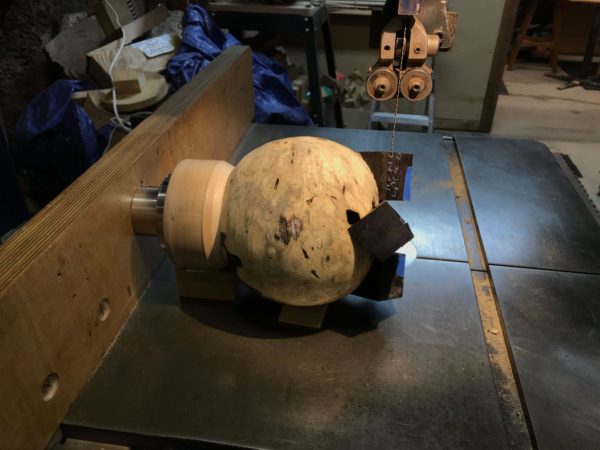
I use “Spec Tape” brand Turners double stick tape all of the time. It’s a very safe way to attach wood to something temporarily. I double stick taped a V block to the 3″ diameter faceplate as well as a shim. A firm grip holding the faceplate to the fence makes for a smooth cut. And by the way, if your bandsaw doesn’t cut well, please consider checking out my Bandsawn Veneers DVD on setting up the bandsaw. It’s called Bandsawn Veneers and it really goes into the details of how to set up your bandsaw and determine the drift of the blade. After that we go into setting the fence. The bandsaw is a wonderful tool and makes ripping much safer than the tablesaw.
After removing some of the extra blackwood on the bandsaw, I remounted the vessel on my OneWay 24/36 lathe and gradually turned it round.
I knew that I would need a “transition” piece or another functional name for it would be a “connector” to join the neck to the hollow vessel sphere. Here’s where the project gets a little bit complicated, but all my friends know that I live for complicated projects, hahahaha.
I had some small spiral segmented rings left over from another vessel project and it occurred to me that I just might be able to use one and get it to fit on my connector. Ebony goes with everything and the same goes for African Blackwood so I began by attaching a piece of ebony to a flat face piece of wood that I had chucked up on one of my 12″ swing lathes. By the way, as a Woodturning School, I own 11 lathes but I store 7 in my garage when not in use and I always keep at least 4 lathes in my shop. It’s a good thing I do because I used all 4 lathes in my shop for this challenging project.
Double stick tape is amazing stuff. As a furniture maker I used it constantly to temporarily attach templates to solid wood for routing shapes. In wood turning, I use it constantly to temporarily attach pieces of wood to waste blocks that I have held in chucks or screwed to a faceplate. This is an excellent method to maintain concentricity. In other words, if you need to join several pieces of wood together (like I am doing for my connector piece) I can mount them, cut a tenon or recess, and then join them to the next piece by cutting a matching recess or tenon.
Make sure that you only use “Turners Tape” because it is strong enough to hold the wood after you have applied some pressure. The brand I use (and I don’t get any money by telling you this) is “Spec Tape” available through Woodcraft and Rockler. There is a cloth back (heavy duty) which I use for the lathe projects and a paper back which I use for lighter duty projects like holding veneers on platens as I flatten them in my drum sander.
I’m racing the clock to get back into my shop because even if I stay up til midnight, I have to do the final glue up, reverse mount using a jam chuck,turn the bottom, sand and finish it tonight in order to deliver it by this Thursday. The recent Fires forced us to evacuate which put me a week behind schedule.
My next challenge was to slowly and carefully turn and shape the connector to accept the buckeye burl neck.
I made a 1/4†x 1/4†piece of tool steel into a domed shaped negative rake scraper which works amazingly well for shaping small 1/4†coves in dense woods. It’s much safer than most tools. I used veneers that I cut from yellow heart to offset the Asian Ebony spiral segments. You can see some tiny bits of yellow heart in the shavings.
After cutting a recess into the sphere vessel, I had to turn a matching tenon on the end of the ebony connector with the segmented ring.
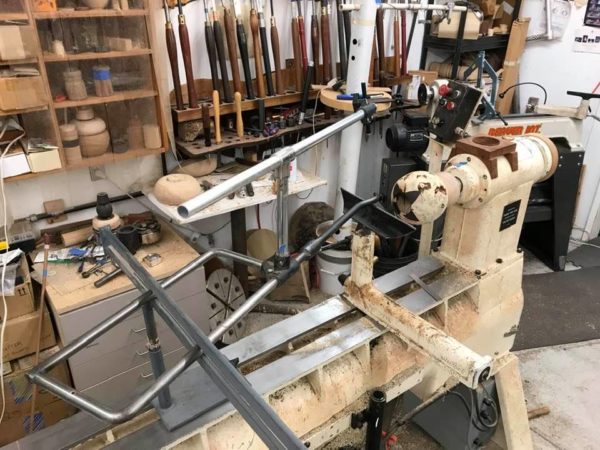
I dry fit the ebony connector piece to the vessel to see how the proportions looked and to try and figure out my next move. I didn’t like the way it looked, it reminded me of Frosty the Snowman photos from children’s books, hahahaha. Oddly enough it reminded me of my friend John Van Der Kolk‘s little buddy “Kev” when John was able to convince Kev to wear a hat! Hahahaha ! Kev is such a good sport!
I thought it was time to mount the buckeye burl neck and begin roughing out that shape because then I would be able to see how the two shapes worked with each other. I had to get creative because I wanted a Natural edge top and I had to figure out a way to hold it while I turned it. I have lots of what I call waste blocks laying around my shop and I found one close to the shape I needed, mounted it into a chuck and then used hot melt glue to add sticks of maple on 4 sides to hold it together. As I began to turn it, I ran into some hardened dirt trapped inside the burl. I dug it out with a knife and filled it with 5 minute epoxy mixed with a charcoal mica powder and black dry pigment powder.
I was able to rescue the neck!!
After doing some shaping on the spiral segmented ring with my 1/4″ square, domed negative rake scraper that I made, it was time to consider the fine details. I went into our home and took a photo of my award winning vessel Sensei, and looked at how I resolved the shapes and beads on that vessel for inspiration on my buckeye burl vessel which I have now decided to title “Metamorphosis”. I know it’s been used before but it sure seems appropriate for the changes this old piece of burl has gone through.
Remember when I said at the beginning of my post “My personal creative process always begins with a drawing and the drawing always depends upon the limitations of the perimeters of a particular piece of wood so the wood and the drawing are interconnected from the start. As I work I modify the drawing to match the wood and I also modify the wood to match the drawing. Empirical woodworking is what I call it, figuring things out as you go.”
Well now it was time to modify my original drawing to readjust for the new changes. I turned the ebony connector piece and cut a small tenon on the end and epoxied it into the recess I cut in the bottom of the neck.
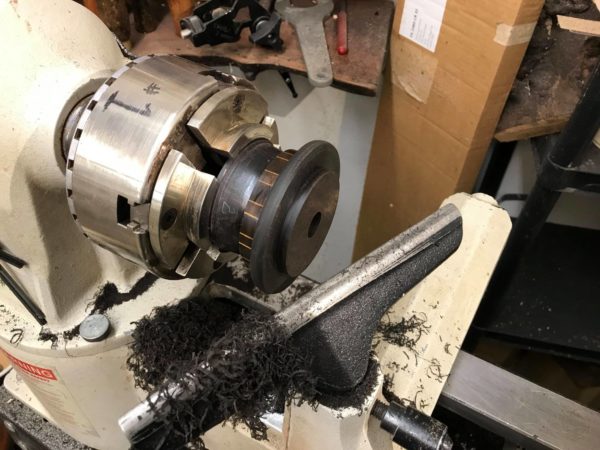
The neck of the vessel was very challenging! Here are a series of sequence shots showing how I was able to shape the neck with a gouge (I used a 3/8″ gouge with a traditional grind with a 50 degree bevel) while slicing through the maple support blocks and hot melt glue. I was pleasantly surprised to see that I could cut most of the shape before I began to lose support at the very tip of one of the natural edges. My next step was to remount the neck using the tenon on the ebony end and mounting it in a chuck. I rely heavily on Center Steadies to do a lot of my more detailed creative work. Pictured here is a center steady that I purchased from my friend Steve Sinner. Steve is an amazing wood artist who makes tools for wood turners.
I like his UHMW (Ultra High Molecular Weight plastic) wheels because they have a firm grip on the wood and reduce vibration.
Advanced Lathe Tools Center Steadies
I knew that the hard plastic wheels would leave an impression on the Buckeye Burl neck because the wood is softer than the wheels but I also knew that after hollowing that I would have enough stock left to turn away the indentation and get the curve I needed out of the stock.
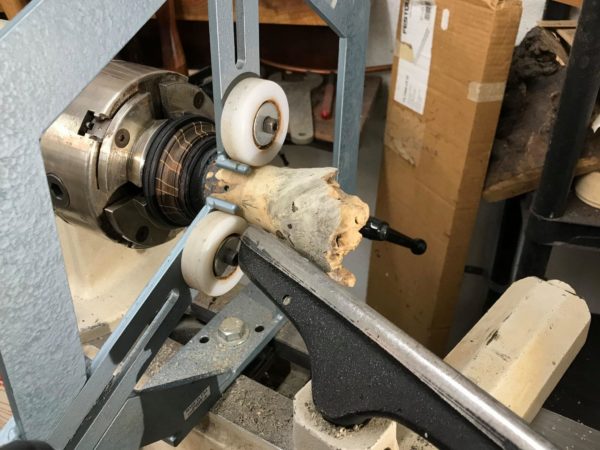
I’m using my Center steady made by Steve Sinner and beginning at slow speed. The center steady is essential for supporting delicate work. I’m using my 3/8†bowl gouge with a traditional grind which is blunt, not swept back, and I have sharpened it with a 50 degree bevel angle.
Here’s a photo of my torque arrest boring bar system. I use the Lyle Jamieson Boring Bar System
which you can purchase here at my website.
I set my laser to 1/4†for the wall thickness.
Well I do like to live on the edge ….. I wasn’t sure what I was going to say if I blew it up….. fortunately I didn’t have to say anything. I took the walls to 1/4†thickness in dry, partially rotten, worm eaten spalted Buckeye Burl that was bone dry.
Well the Steve Sinner Center Steady has really stabilized the neck and given me more confidence to get braver as I hollow using my 3/8†Thompson tools gouge with a 40/40 grind. I get the cleanest cut with very light push cuts towards the headstock. Thanks to Stu Batty for being a guest instructor at my school 3 years in a row and a shout out to Mike Mahoney and Ashley Harwood who have taught at my school as guest instructors and I have learned a lot from all of these masters.
Well everyone loves a story with a happy ending and I am glad to say that this one has one. First I would like to thank my lovely wife Victoria Marks for being so understanding and giving me the space to run with this project.We just celebrated our 43rd Wedding anniversary on Sept 4th and being an optimist,I’m looking forward to the next 43 years, hahaha. Next I would like to thank all of my friends and family for encouraging me along the way and cheering me on. As I said earlier,this project began with a cup of coffee one morning and photos of a an incredible old piece of Buckeye Burl and the drawing of what I intended to make from it. What turned this into an ongoing story was the amazing response I received from all of you guys after posting the first photos and writings on Facebook. So thank you all once again and now let’s get on with it.
After hollowing the neck, I glued it into the recess I cut in the vessel. Then I parted it off the mounting block and made a reverse jam chuck to hold it while I turned the bottom. I used my tail stock to support it with a wooden dowel to cover the point. Also I was able to turn the dowel to a smaller diameter in order to get closer to the center. After that I used my Foredom rotary grinder with a carbide ball mill to remove the nub. Next I chucked a 1″ diameter sanding pad in my drill press and smoothed the center.I used my wood burning tool to sign and date the bottom.
Knowing there was soft areas in the burl that had suffered from dry rot, I decided to hand sand the vessel off the lathe. I sanded everything to 320 grit. It was getting difficult to sand it and keep it round due to the very soft area that had dry rot. I decided not to go the route of soaking the soft areas in CA glue and filling the voids with epoxy. For this piece, I wanted to emphasize the holes,and dry rot because of the texture quality it would add to the completed vessel. And rather than apply 20 coats of lacquer and polish it out like I have done on some of my gilded vessels, I decided to go with a very light, soft satin sheen finish that would be more appropriate to the piece.
I applied one coat of oil (Seal a Cell) let it dry in my finishing room at 80 degrees overnight, then rubbed everything down with 0000 steel wool. The next day, I applied a second coat of the same oil and allowed it to dry overnight in my heated drying room. Thursday I buffed it really well with Renaissance Wax, took lots of photos and some video. I was running late and the Sonoma County Museum closed at 5:00 so it was time to load everything up and race to the Museum. Traffic in Santa Rosa is beginning to look like a lot of cities so I was delayed quite a bit but was very glad to see the clock said 4:20 when I walked in the door with my vessel. There was a lot of incredible work there and I know it will be another excellent show.
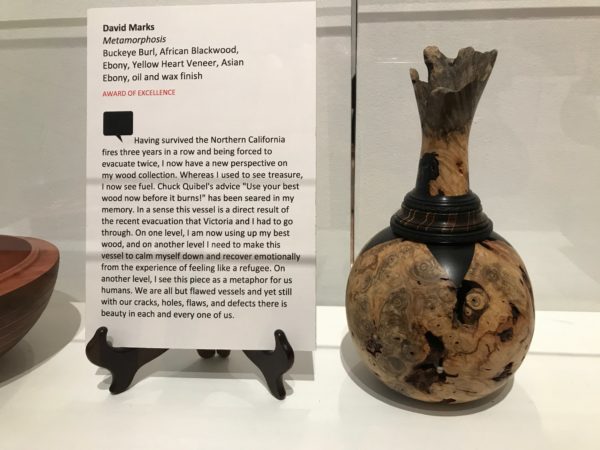
I decided to name my vessel “Metamorphosis” and here is my Artist’s Statement for my entry:
Having survived the Northern California fires 3 years in a row and being forced to evacuate twice, I now have a new perspective on my wood collection. Whereas I used to see treasure, now I see fuel. Chuck Quibell’s advice “Use your best wood now before it burns!†has been seared into my memory. In a sense this vessel is a direct result of the recent evacuation that Victoria & I had to go thru. On one level I am now using up my best wood, and on another level I needed to make this vessel to calm myself down and recover emotionally from the experience of feeling like a refugee. On another level I see this completed piece as a metaphor for us humans. We are all but flawed vessels and yet still with our cracks, holes, flaws and defects there is beauty in each and every one of us.
Metamorphosis received an Award of Excellence at the show!